As i describe how to scan with nmap in this article, today i am goiing to show how to scan network in a advanced way.
1 . Layout

Im using python HTTP server in different ports such as on , off, well known and less known ports to demonstrate how this is working
First of all we can discuss how the Transmission Control Protocol Breakdown
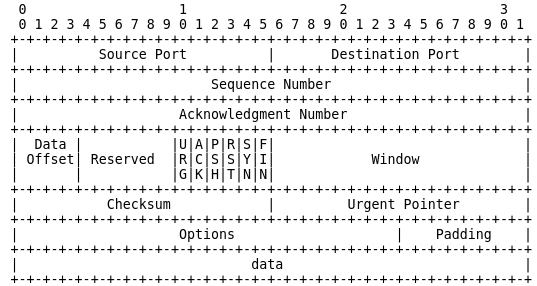
Each TCP packet has a section in it’s memory buffer where Control Bits such as URG | ACK | PSH | RST | SYN | FIN can be set.

So How is this URG, ACK, PSH, RST, SYN, FIN works?
here is a small photo that describes all
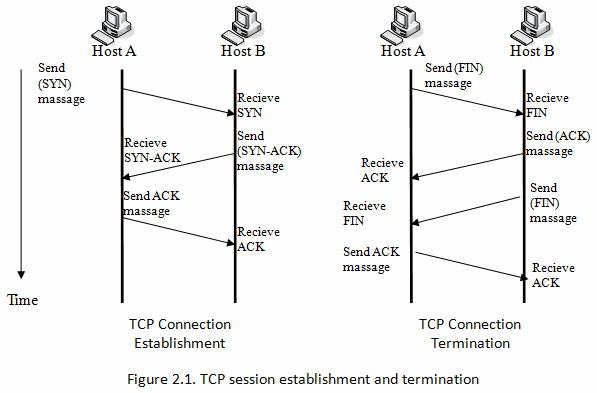
Can we change the state SYN to ACK ?
- yes, that is possible. thats why we need nmap and hping for that
from those tools we can send specific control bits in packets which we are send.
Let's discuss how ip scanners are working
Normally they scanning via icmp
So First of all i scanned my network

so 103 is my ubuntu ip

So simply i disabled icmp in ubuntu
and edit 1 to 0

then again i tried to scan the network

Boom! it not discovering
Then i tried to ping ubuntu machine

it was unsuccessful
SYN Scan
So i was tried to scan using syn scan
#hping : hping -S <address block>
#Nmap : nmap -sS <address block>
#fping : fping -a -g <address block>
hping
-S : Sets the SYN flag getting passed onto the packet
nmap
-sS : SYN flag scan
-sn: ICMP ECHO scan

This is how wireshark looks like when running syn scan
I used firewall to block the 80 port and check syn scan

then enable port 80 in the firewall and tried

Boom! it received SYN,ACK flag

RST scan

ACK Scan

NULL Scan
hping -F -P -U <ip address>
in this command you can see it has multiple Flags

Nmap commands are :
-sX (Xmas scan)
-sN (Null scan)